前言
本文主要纪录CentOS7安装MySQL5.7,数据库的字符集设置,设置防火墙端口,以及创建删除用户并授权等操作。
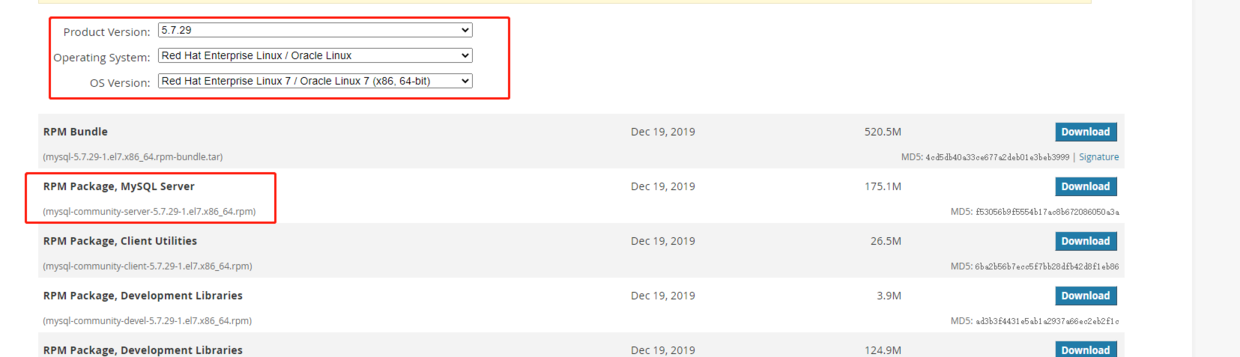
MySQL下载
共需要下载五个软件包
1
2
3
4
5
mysql-community-common-5.7.29-1.el7.x86_64.rpm
mysql-community-libs-5.7.29-1.el7.x86_64.rpm
mysql-community-client-5.7.29-1.el7.x86_64.rpm
mysql-community-server-5.7.29-1.el7.x86_64.rpm
mysql-community-devel-5.7.29-1.el7.x86_64.rpm
环境检测
检测系统是否自带Mysql
1
2
3
4
rpm -qa|grep mysql
如存在进行强行卸载
rpm -e --nodeps mysql-libs检测系统是否自带mariadb
1
2
3
4
rpm -qa|grep mariadb
如存在进行强行卸载
rpm -e --nodeps mariadb-libs检测mysql依赖环境
1
2
3
4
5
6
7
rpm -qa|grep libaio
如未安装,进行安装
yum install libaio
rpm -qa|grep net-tools
如未安装,进行安装
yum install net-tools查看tmp权限
1
ll /

安装
按顺序逐个安装rpm
1
2
3
4
5
6i: 安装 v:信息 h:进度条
rpm -ivh mysql-community-common-5.7.29-1.el7.x86_64.rpm
rpm -ivh mysql-community-libs-5.7.29-1.el7.x86_64.rpm
rpm -ivh mysql-community-client-5.7.29-1.el7.x86_64.rpm
rpm -ivh mysql-community-server-5.7.29-1.el7.x86_64.rpm
rpm -ivh mysql-community-devel-5.7.29-1.el7.x86_64.rpm安装完成后,查看版本,并启动服务查看密码
1
2查看版本
mysqladmin --versionmysql服务初始化
1
mysqld --initialize --user=mysql
查看首次安装后,mysql默认生成的root密码
1
2查看密码
cat /var/log/mysqld.log | grep password安装完成后启动mysql服务
1
2
3
4启动服务
systemctl start mysqld
查看状态
systemctl status mysqld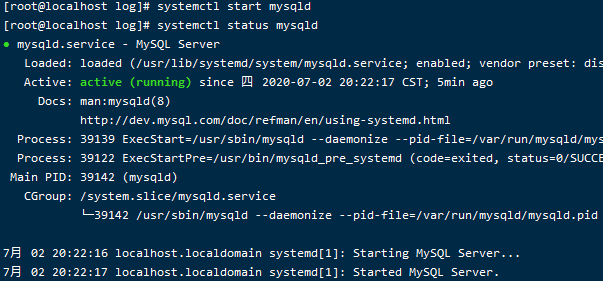
登录数据库,并修改数据库密码。输入日志中生成的密码。
1
2
3
4
mysql -u root -p
修改密码
ALTER USER 'root'@'localhost' IDENTIFIED BY 'new password';
退出登录
1
2退出登录
quit;测试
1
2
3
4
5
6创建数据库
create database mydb;
使用新建的数据库
user mydb
创建表
create table mytbl (id int, name varchar(20));查看mysql是否是自启动。默认为自启动
1
systemctl list-unit-files | grep mysqld

如果不是自启动可以通过一下方式设置开机启动。
1
2
systemctl enable mysqld
systemctl daemon-reload
字符集
配置mysql默认编码为utf-8
1
2
3
4
5
6
7
vim /etc/my.cnf
在最后加上中文字符集配置
character_set_server=utf8
重启mysql
systemctl restart mysqld登录root用户查看编码
1
show variables like '%character%';

已生成的库表字符集更改
1
2
3
4
5
6
7查看已创建数据库的字符集
show create database mydb;
修改数据库的字符集
alter database mydb character set 'utf8';
修改表的字符集
alter table mytbl convert to character set 'utf8';
防火墙
如果远程连接时, 需要开放端口
1 | 查看防火墙开放端口列表 |
权限
查看系统用户表
1
2
3
4
5
6
7
8切换到系统数据库
use mysql
列式显示数据
select * from user\G;
查看地址,用户和密码。
select host,user,authentication_string from user;创建用户
远程登录的用户无法在本地登录。1
2
3
4
5mysql -u root -p
create user 'test'@'localhost' identified by 'test_local123'; #本地登录
create user 'test'@'%' identified by 'test_remote123'; #远程登录
quit
mysql -u test -p #测试是否创建成功为用户授权
授权格式:grant 权限 on 数据库.* to 用户名@登录主机 identified by ‘密码’;
1
2
3
4
5
6
7
8
9
10
11
12
13
14
15
16
17
18
19
20dmysql -u root -p
创建数据库
create database testDB;
create database testDB default charset utf8 collate utf8_general_ci;
授权test用户拥有testDB数据库的所有权限:
grant all privileges on testdb.* to 'test_auth'@'localhost' identified by 'test_auth_local123'; #本地登录
flush privileges; #刷新系统权限表
grant all privileges on testdb.* to 'test_auth'@'%' identified by 'test_auth_remote123'; #远程登录
flush privileges; #刷新系统权限表
指定部分权限给用户:
grant select,update on testDB.* to 'test'@'localhost' identified by '1234';
flush privileges; #刷新系统权限表
授权test用户拥有所有数据库的某些权限:
grant select,delete,update,create,drop on . to test@'%' identified by '1234'; #'%' 表示对所有非本地主机授权,不包括localhost
flush privileges; #刷新系统权限表删除用户
1
2
3
4
5
6
7
8
9删除用户
mysql -u root -p
delete from mysql.user where user ='test' and host ='localhost';
flush privileges;
drop database testdb;
删除账户及权限:
drop user 用户名@'%';
drop user 用户名@localhost;修改指定用户密码
1
2
3
mysql -u root -p
mysql> update mysql.user set authentication_string = password('test_auth_remote') where user='test_auth' and host= '%';
mysql> flush privileges;